Spare Time Activities/What whippings are
| Spare Time Activities: | Foreword | 1 | 2 | 3 | 4 | 5 | 6 | 7 | 8 | 9 | 10 | 11 | 12 | 13 | 14 | 15 | 16 | 17 | 18 | 19 | 20 | 21 | 22 | 23 | 24 | 25 |
What whippings are
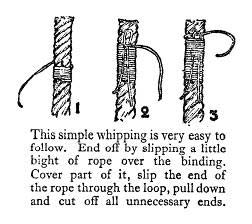
YOU will remember that when we were talking about splicing I said that it was far better to do a whipping on the end of a rope to prevent it from coming unlaid than to adopt the more untidy way of finishing it off with a crown and back-splice. The drawback to this last method is that it makes the rope so much thicker at the end, so only do a crown and backsplice when you haven’t the time for the more workmanlike whipping. I want now to show you three different whippings, and then you will know enough about whipping to tackle any job that comes along. First of all, then, the ordinary whipping. This is generally used for finishing off the end of a rope and also for binding such things as fishing- rods, bat handles and thumbsticks. To make this whipping lay the end alongside your rope or whatever you may be binding and bind it securely down as you see in figure 1. Take care that you serve it evenly, and that no one turn overrides another. There are several ways of finishing off. Perhaps the easiest is to bind in a little bight of twine as you see in figure 2, then when you arrive at the finishing point, slip the end through the bight and pull it down through the binding (figure 3), carrying the end with it; then cut the end off close up so that it does not show. This makes a very secure and neat job.
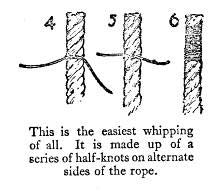
Another very good whipping, which deserves to be used much more than it is, is the West- country whipping; this is perhaps the easiest of them all. To make it you simply tie a half-knot in the middle of your thread as shown in figure 4. Then take the ends round to the other side and tie another half-knot, then back again to the first side and tie another, and so on and so forth until your whipping is long enough. Lastly, you finish off by making a half-hitch round the rope with each end of your thread and then tie them together, needless to say, with a reef knot. You will find this a very easy and quick whipping to do, and it certainly holds very tightly, though it is not perhaps quite so neat as the first one. We have saved the best one of all till last. It is a bit more difficult than the others and takes a little longer, but it is well worth the extra trouble, and once made practically stops there for ever. It is called a needle whipping or sometimes a sailmaker’s whipping, and to make it you need a needle (sorry, no pun intended!) and waxed thread.
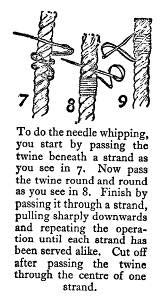
Start inboard and work outward towards the end. The diagram, figure 7, shows you how to start. Slip the needle under one strand, lay the short end along the rope, then bind it in just the same way as you did the first whipping. When you get to the end, push the needle between either of the strands, pull the end up close to the whipping, then carry it back over the top of the whipping following the lay of the rope. Now go under a strand on the other side of the whipping and so on backward and forward until each strand has been served alike. A glance at figure 9 will make this clear. To finish off you push the needle up through the middle of either strand on the inboard side, then cut off close up, and your sailmakers’ whipping is complete.
The hemp thread which saddlers and shoemakers use is the best stuff to use for whipping, about three thicknesses worked up together with cobbler’s wax or beeswax will stand anything, being much stronger than ordinary twine. Now you know all about whipping, and there is no excuse for you if the ends of your ropes come unlaid. I want you to take a real sailor’s pride in any rope you may have to deal with ; there is all the difference in the world between a neatly whipped rope’s end and one that looks like a cow’s tail. These little things, like shoes laced Scout fashion and shirt sleeves cut short at the elbows, all go to show which side of the hedge you are on.


