Spare Time Activities/How to make buttons
| Spare Time Activities: | Foreword | 1 | 2 | 3 | 4 | 5 | 6 | 7 | 8 | 9 | 10 | 11 | 12 | 13 | 14 | 15 | 16 | 17 | 18 | 19 | 20 | 21 | 22 | 23 | 24 | 25 |
How to make buttons
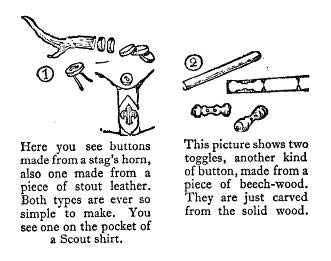
IF you have never seen Dan Beard or read any of his books, you may have wondered who he is when I have referred to him in this publication. You ought to know all about him, for he is one of the finest Scouts living, and one of the few remaining old-time pioneers whom we know as “buckskin men.” He is the guide, philosopher and friend of our brother Scouts in America, and as you cannot get directly in touch with him, I am going to start this chapter by handing on one of his ideas for making buttons. You get an old stag’s horn (which can be done even in England, if you happen to know where there are any herds of deer, and then keep your eyes open when they are shedding their horns) and saw off little flat discs about ¼ in. thick, like those shown in diagram 1. Drill a couple of holes through each disc, and then you have a most serviceable button, which you can either leave plain or ornament by carving, according to your own taste or fancy. The same idea could be used in making buttons of leather. Just cut discs of the right size out of any odd pieces of stout leather you may have lying about, and you can soon have a set of buttons of the “buckskin man” type. Diagram 1 shows you what they look like. Then, of course, there’s the toggle, which is quite a good backwoods fastening whether for your coat or tent flaps. If you are keen on whittling or chip-carving you could fashion a ripping set of toggles out of a beech-wood dowel which you can buy for a few pence. Diagram
2 will give you the idea. When you have made them you can make them look like old bog oak by soaking them in a strong solution of permanganate of potash.
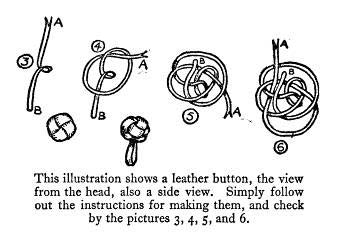
You could apply this toggle idea to bone as well, though it is a bit more difficult to carve. Probably most of you have made the button described by the Chief Scout, in Scouting for Boys, and a jolly good button it is, too. Here’s another leather one you might like to try. To make this type of button you take a piece of leather about 7 inches long, and say, ¼ in. wide, though of course this varies with the size of the button you are making. If you want shirt buttons an ordinary brown leather bootlace hammered out flat does admirably.
Having got your leather, you first double it in the middle with the end A away from you to the left and the end B to you on the right (diagram 3), A is then taken completely round from left to right, then in front of B and up through itself (diagram 4). Next you take the other end B and go round in the same way and the same direction, coming round over the top of end A and up under the next strand on its left (diagram 5). Lastly, take the first end A, put it up over the one that you last put B under, and then thread it under the next one to it. Diagram 6 will make this clear. You will have to learn how to do this slowly, one step at a time. If you read it again carefully and work it out gradually it will soon become clear. Having learned how to get each end in its right place, all you have to do is to work the button up tight and flatten it into shape and the thing is done. When you have got it really tight all round, pull hard on the ends and then cut them off close up to the button so that they will not show. With a little bit of practice you will get quite quick at this and turn out a set of buttons easily in half an hour. A little tip to remember is that it is much better to work with leather which has been wetted; it packs together nicely and so makes a much neater and harder button when it has dried out. The way to get the leather right is to put it in water till it is soaked, then lay it aside for ten minutes or so to dry, then it is just the right degree of dampness for work. Have a try at making some of the buttons I have described next time your Patrol meets. It would be fine for them all to have buttons on their uniforms made by themselves, and when you have done that you could make enough cash to pay a year’s subscription to The Scout by selling sets of buttons to other people who are not so clever at button-making as yourself. This type of button is excellent for use on sports coats and so on. Every fellow can find a use for home-made buttons. [1]


