Spare Time Activities/Useful basuto sandals
| Spare Time Activities: | Foreword | 1 | 2 | 3 | 4 | 5 | 6 | 7 | 8 | 9 | 10 | 11 | 12 | 13 | 14 | 15 | 16 | 17 | 18 | 19 | 20 | 21 | 22 | 23 | 24 | 25 |
Useful basuto sandals
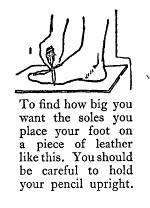
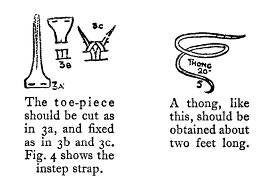
How would you like to be shut up in a more or less airtight case, in which you could only just move and with the sun and light shut out all day long? Well, that is how your feet feel about it. We shut them up in tight leather cases, and very seldom let them out for a little fresh air or a sun bath, and then wonder why they put up a protest in the shape of a corn or a blister when we ask them to take us for a hike. Why not give your feet a holiday now and then by wearing sandals whenever you can in camp or club-room? There is nothing which gives you such freedom and real foot comfort. The illustrations show the way the Basutos in South Africa make their sandals. First of all you get a couple of pieces of leather just a little larger than your flat feet. Put your foot down on one and draw round it with a pencil, taking great care to keep the pencil upright. Do not cut round this line, though. You must make the sandal ½ in. bigger all round than your foot, so run another line round ½ in. away from the other one, not with an ordinary knife but with a sharp knife, which makes all the difference. Diagram 1 makes this clear. Now put your foot on the leather shape again and make a mark with a pencil between your big toe and the next one; then cut a little slit about ½ in. wide across this mark and two more slits parallel with the first one and about ⅓ in. apart. You will see what I mean by referring to diagram 2. After that you make the toe-piece (diagram 3a). It is better not to use leather which is too stiff or hard for this, because it has to fit snugly between the big toe and its neighbour. Use some soft fabric. You fix this toe-piece by putting the ends down through the first slit, up through the next, then down through the third slit; they are then made fast by putting the ends under their own standing points. Perhaps that is a bit difficult to follow, but diagrams 3b and 3c will make it quite clear.
Having done all this, you next make the instep strap, which is simply a piece of stoutish leather about 6 in. long by 1 in. wide. Cut two ½-in. slits in each end, as shown in the fourth diagram. Now put your foot in the sole again and mark the places on either side for the slits to take the instep strap. Again see diagram 2. Cut two 1-in. slits and pass the strap through.
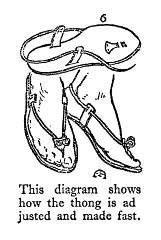
Then last of all make the retaining thong, which is a strip of rawhide, the stuff which merchants call Helvetia rawhide is best. You will want somewhere about 2 ft. of it for each sandal, a ¼ in. wide. If you examine diagram 6 carefully you will see how this is adjusted and made fast. Point each end of this thong, and just border the tips by toasting them by the fire a little. Bore three or four holes so that you can adjust the thong to any degree of tightness, and simply make fast by doubling the ends back on themselves and pushing the points through the hole which is most convenient. Diagram 6a shows the thong fastened. Well, that is all there is in it, and having once worn sandals you will simply hate having to go back to boots. A great advantage of sandals is that you don’t need to wear stockings with them; so there is no question of catching cold through wearing wet stockings in rainy weather; and also somebody – and I hope yourself – is saved hours of darning stockings or socks.


