Spare Time Activities/More about splicing
| Spare Time Activities: | Foreword | 1 | 2 | 3 | 4 | 5 | 6 | 7 | 8 | 9 | 10 | 11 | 12 | 13 | 14 | 15 | 16 | 17 | 18 | 19 | 20 | 21 | 22 | 23 | 24 | 25 |
More about splicing
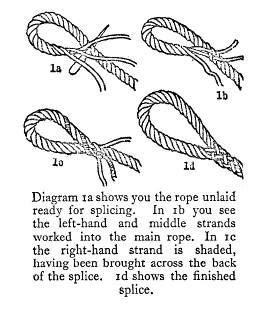
HAVING done a crown and back-splice, you might next try your hand at an eyesplice. This is perhaps a little more difficult, but it will come all right if you begin the right way, so let us make that clear first of all. Unlay the rope as before, and arrange the strands so that you have one in the middle, one on the left and one on the right (diagram la).
Remember that order because that is the order in which the ends have to be spliced. Now make your eye, or loop, as big as you need, see that there are no kinks in it, open up any strand on the main rope and put your middle end through it. That’s the first thing done. Next you put the left-hand end over the strand that the middle one went under, and then under the next strand to the left. Diagram 1b makes this clear. (Just say that slowly once or twice and you will get it.) Remember always that the ends which you are working with never cross each other but are woven into the main strands of the rope. So far we have disposed of two ends and only one now remains, the right-hand one. This is the most difficult of the three, but if you turn the splice round you will see that there is one strand of the rope which has not yet an end through it, and this is the one through which the last end goes. But in order to get it across the lay of the rope you must bring this end right across the back of the splice and go in from right to left. See the shaded strand in diagram 1c, which shows how this is done. Having completed this first task, all your difficulties are over, and you can now go straight ahead as in the backsplice; each end in turn going over and under one strand at a time, and tapering off as before. Three complete tucks are really enough, but it is better to do a few more and taper off gradually in a neat and workmanlike way. Diagram 1d shows the finished eyesplice. Probably you have had enough of splicing by this time, if so you need not read any more; this article ought really to be taken in three “goes,” like breakfast, dinner and tea. One is apt to get indigestion after eating all three meals at one sitting. The thing to do is just to take one splice at a time, and come back for another when you have digested the first. So assuming that you can do backsplice and eyesplice, the next one to learn is the short splice, which is used to join two pieces of rope together when you are in a hurry. To make it you unlay the two ends to be joined, the same as before, and interlock the two ends each in the other. You will probably find it helps at this stage just to put a seizing round the two where they meet to keep them in place. Having done this, you follow the old plan which you have learned in the other splices, putting each end in turn over and then under the strands of the opposite end of the rope. Then turn round and serve the opposite ends in the same way.
Diagram la shows you the rope unlaid ready for splicing. In 1b you see the left-hand and middle strands worked into the main rope. In 1c the right-hand strand is shaded, having been brought across the back of the spike, 1d shows the finished splice. When you have done one complete tuck each way, pull tight, and then do two or three more tucks each side. Taper and cut off as usual, finishing off with a roll under the foot to put on the final polish. The only drawback to this splice is that it makes the rope so much thicker at the point where the splice comes, that’s why I must teach you how to do a longsplice sometime, but we will deal with that another time. There is no need to brand your staff again, that is if you did it after making the splices described in the last chapter. If you didn’t, you’ll find the brand repeated in the heading of this chapter.

