Spare Time Activities/Two easy-to-make kitbags
| Spare Time Activities: | Foreword | 1 | 2 | 3 | 4 | 5 | 6 | 7 | 8 | 9 | 10 | 11 | 12 | 13 | 14 | 15 | 16 | 17 | 18 | 19 | 20 | 21 | 22 | 23 | 24 | 25 |
Two easy-to-make kitbags
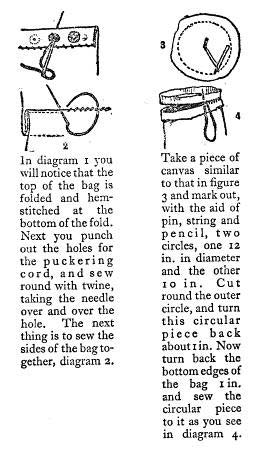
EVERY fellow needs a kitbag of some kind for camp, and many of you I know would much rather make one for yourselves than buy one, especially if you have acquired the habit of making the things I have been talking about in the previous chapters. To make an ordinary kitbag you need a piece of material about 5 ft. long by 3 ft. wide. There is no need for you to buy brand-new canvas for this. Perhaps you have an old tent lying about which is no longer useful as a tent but with still enough wear left in it for a kitbag. Even a cement bag well beaten and turned inside out is not to be despised. Then you take some waxed twine and a sail needle, a palm also is useful, and a little grease to make the needle work easily. For the body of the bag, assuming that you are going to make a kitbag a 2 ft. 6 in. long, you cut out a piece of canvas 38 in. by 34 in. Begin by folding over the top of your bag as shown in figure 1, each fold is 1 in. wide, and you sew along the bottom of the hem with a flat stitch. Next you make the eyelet holes for the puckering cord to ran through. If you look again at figure 1 you will see how this is done. First punch out the hole, then wind some twine round the edges, and lastly sew all round the hole over and over the turns of twine.
Having done all this you sew the side edges of the bag together in the manner shown in figure 2. This is called a flat seam. The diagram shows only one side being sewn, but actually you sew your seam on both sides, making a fine secure job of it similar to a lapped joint in a billycan.
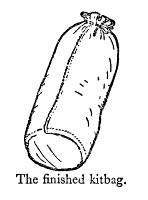
That finishes the body. Turn it inside out and now you have a canvas tube open at each end. Take another piece of canvas, similar to that in figure 3, and draw two circles on it, using pin, pencil and piece of string to make the lines, one 12 in. in diameter and the other 10 in. Now cut round the outer circle. Figure 4 makes the next process clear. Make sure that the bag is inside out, then turn back about 1 in. at the edges of your circular piece and 1 in. of the bottom of the kitbag itself, then sew on as you see in the diagram. Last of all you sew the bottom edge of the bag to the sides. Glance back at the finished kitbag, which shows you where these stitches should come, then turn your bag right side out, reeve a piece of cord through the eyelets and splice the ends together and you hare a kitbag of which you can be proud.
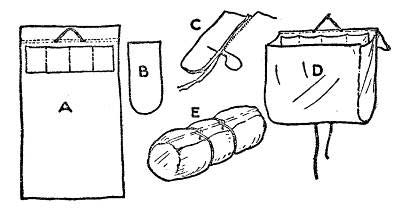
These diagrams show you another type of kitbag. It has the advantage of having pockets. A shows the piece of canvas, with the hem 6 in. down from the top. Through this you pass a strip of wood and make a hanger of cord. Just below is a piece of canvas with four divisions – the pockets. s B hows one of the side-pieces; while in C you have the method of sewing it to the bag. To make the hanger shown in D, get a piece of cord, bore two holes in the wooden strip, pass the cord through, and knot inside and outside. The two long ends of cord are used for securing the pack when rolled up as you see in E. Another type of kitbag is adapted from Abercrombie’s Kewadin pack. Figures D and E show you what it looks like. The pockets are very handy, and its great advantage is that you can get at things easier than in the ordinary pack or kitbag, for it’s queer how things seem to have an uncanny knack of getting down to the bottom of a kitbag whenever they are wanted. You see in figure A the first stage in its construction. A piece of canvas is needed about 4 ft. 6 in. long by 2 ft. 6 in. wide. About 6 in. from the top fold over and stitch up a hem 1 in. wide; inside this you slip a strip of wood as shown by the dotted line at the top of diagram A. Then you sew on a piece of canvas about 2 ft. long by 8 in. wide to form the inside pockets. These again you see in diagram A. Now make the sides as shown in B. They are cut out of pieces of canvas 2 ft. long by 10 in. wide. Round off the lower ends as illustrated. Diagram C shows you how to stitch the sides together, working, as always, with the bag inside out. Having finished this, all that remains to be done is to bore two holes in the wooden strip and insert a piece of cord, knotting it both inside and out, so that there is a loop on the inside, to hang it up by, and two long ends outside for securing the pack when it is rolled up. If you make this type of kitbag you will see that very little adaptation is needed to convert it into a rucksack; a few eyelets round the top and a couple of slings and the job is done. See what you can evolve out of this.


