Spare Time Activities/How to splice ropes
| Spare Time Activities: | Foreword | 1 | 2 | 3 | 4 | 5 | 6 | 7 | 8 | 9 | 10 | 11 | 12 | 13 | 14 | 15 | 16 | 17 | 18 | 19 | 20 | 21 | 22 | 23 | 24 | 25 |
How to splice ropes
IF you want to be anything of a handyman you must know how to splice; it is one of those little “odd and endy” sort of accomplishments which every Scout should have, whether in camp or in everyday life. You know anyone can tell at a glance on entering a Scout camp or clubroom whether it is just the ordinary kind of troop, or one in which the chaps really know how to do things for themselves. Such things as a guy line or a drag rope neatly spliced, or ends of lashings properly whipped, all quietly testify to the efficiency of the fellows in the troop, and these are the things which rejoice the heart of the old camper, far more than sleeves covered with proficiency badges, which so seldom indicate any sort of proficiency in their wearers. So in this chapter we will tackle splicing, though I fear it is very difficult to explain in cold print. If you were all here it would be so easy to show you how to do it, but as you cannot all come here to camp I must try to “broadcast” to you through these pages. Suppose we begin with the crown knot and backsplice. This is used on the end of a rope to prevent it from becoming unravelled, and when you cannot spare the time to make a more permanent and neater job of it.
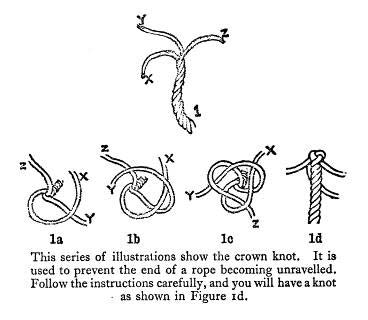
You begin by unlaying the rope a sufficient distance, which is roughly about ten tunes its thickness (a rope ½ in. thick would be unlaid about 5 or 6 in.). Be very careful about this unlaying, and keep a hold on the strands so that they will not lose the twist which gives them their strength. Having unlaid your rope, the end should now look like diagram 1, with the three strands X Y Z banging down equally on three sides.
Now take X and put it over Y (diagram 1a). Then take Y and lay it over X and Z (diagram 1b). Lastly, put Z down through the bight of X and there is your crown knot complete (diagram 1c). Then you tighten up the crown by pulling gradually on each strand in succession till it is all snug and tight (diagram 1d).
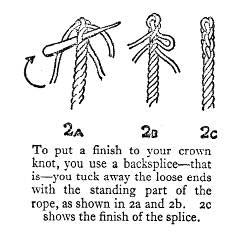
Now you have to splice back the ends; to do this you need the marline-spike on your Scout knife; that’s what it’s there for, you know. With it you open the strands of the rope (diagram 2a) and put each end in turn over the nearest strand and under the second one (diagram 2b), always remembering to work diagonally across the lay of the rope. Have you got that, I wonder? You ought to learn that little bit by heart, for it applies to practically all splicing; just remember over one and under one. Diagrams 2a, 2b and 2c will help you considerably. Just follow it out and you will see daylight ahead. When you have completed the first tuck (each end in turn has been over and under a strand of the main rope), you can then start to taper off. To do this you very carefully unlay one of the smaller strands of which the bigger strands are made up and cut it out close up, so that it will not show. This of course makes the strands thinner, and if you do it every time you complete a tuck you will find that your splice tapers off and looks very neat. Remember to pull the strands up tight and close after each tuck, otherwise you will have a loose, ungainly end to your rope which will soon come undone. If you are in a hurry, three complete tucks will hold all right, but it is better to do five or six and really make a good job of it if you have time. Then, when it is done and the ends cut off, lay the rope on the ground and roll the splice under your foot to put on a finishing touch. [1]


