Spare Time Activities/A scout shirt
| Spare Time Activities: | Foreword | 1 | 2 | 3 | 4 | 5 | 6 | 7 | 8 | 9 | 10 | 11 | 12 | 13 | 14 | 15 | 16 | 17 | 18 | 19 | 20 | 21 | 22 | 23 | 24 | 25 |
A scout shirt
WHY not make your own Scout shirt? There are no outfitters in the backwoods, and the old-time pioneers, if they needed clothing, just had to make it themselves in the same way as the Redskins, out of soft doeskin maybe, sewn together with sinew. So every Scout ought to feel that he can, if necessary, turn out a comfortable garment for himself, which looks neat and workmanlike, and which he can feel
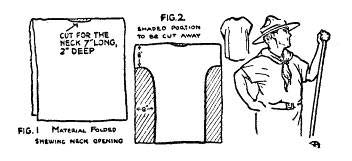
proud of as his own handiwork. The fact that his shirt was made by himself makes it ten times more valuable to a Scout than a shop-made article for which he has done nothing but hand a few coins over a counter. Probably you will not get doeskin for your home-made shirt, but khaki drill or flannel or other shirt material – especially jungle cloth if you can get it – will do just as well, and is incidentally much more comfortable and easy to keep clean. Whatever the material chosen, you will need a piece of it 1 yd. wide and about 2 yds. long. Double it across the middle, and cut out a piece of the centre of the fold 7 in. long and 2 in. deep at the deepest part, as you see in the diagram (1). This forms the hole for your head to go through. There is no need at all for a Scout shirt to have a turn-down collar; it would be covered up by the scarf in any case, and a Scout wants to have plenty of freedom for his neck. Also, like sailors, he wants to get all the fresh air he can on his skin, so he does not muffle up his neck with wraps and comforters. All this shirt needs is just a hem round the neck opening, or, if you wish, bind it round with a piece of braid or softer material.
You first of all obtain your piece of material and double it (fig. 1). Cut the neck-piece and form the sleeves by cutting the pieces shown by the shaded parts (fig. 2). Hem and stitch together, and your shirt is complete. Then in order to form the sleeves you cut out a piece from each side of the doubled cloth, 8 in. from each side, and make the sleeves themselves 8 in. wide (diagram 2). This means that the sleeves will be 16 in. round, which gives you plenty of freedom. It is hardly necessary to say that this shirt is meant for the open air, free-and-easy type of Scout, who does plenty of hiking and camping and so needs a loose, comfortable shirt, with sleeves which terminate at the elbows. This kind of chap knows how uncomfortable and hot that wad of rolled up sleeve is, and how it prevents the free passage of air when tramping along on a hot summer’s day. “What about a cold winter’s day?” did you say. Well, of course, you are not going to be a fool and stand about with bare arms and insufficient clothing when there is a cutting east wind and the thermometer below zero. There is no point in swanking as a hardy Scout with bare arms and summer attire when you ought to be warmly clad. Some chaps seem to think that hardiness and foolhardiness are the same thing, camping out at Christmas-time with one blanket and all that sort of thing. So in cold weather wear an Eskimo Timiac, which we told you how to make in Chapter III, then you can defy the cold. Of course, knees don’t matter; did you ever meet anyone with a cold in his knees? Keep your body warm and all is well. But let us get back to our shirt. This kind of shirt is not sewn up with deer sinew; in fact, if you are wise, you will be humble enough to ask your mother to let you use the prosaic but very useful sewing machine. This will probably need a little tactful persuasion and a preliminary lesson in its use. You can point out that it is your great ambition to become a real handyman. Well, then, you simply sew the shirt right up the sides, leaving a little piece, about 4 in., unsewn at the bottom. You may find the armholes a bit difficult to negotiate. Remember to hem the sleeves wrong side out, and not to sew up the armholes; the hemming is best done before sewing up the sides. Lastly, you hem round the bottom and then turn the shirt right side out. If you need pockets you can put on a couple of patch pockets made out of the material cut off the sides – but it looks very nice and plain with no pockets at all. Now try your shirt on and see if you are not proud of your handiwork.

